0%

浏览器进程和线程

众所周知,浏览器每次在打开一个新页面的时候会创建一个独立于其他页面的Render进程 (渲染进程) ,而在这个渲染进程中包含了页面的渲染、JS的执行、事件的循环(Event Loop)等任务

重点概念:浏览器的渲染进程是多线程的

下面列举一下渲染进程的常驻线程:

  • GUI渲染线程
  • JS引擎线程
  • 事件触发线程
  • 定时触发器线程
  • 异步http请求线程

我们需要注意:GUI渲染线程和JS引擎线程是互斥的(由于JS能操作DOM,浏览器防止渲染出现不可预料的后果,将这两个线程设置为互斥),这也就意味着如果出现密集型的JS操作,将会堵塞GUI渲染进程,从而导致网页卡顿

Tips:JS引擎是单线程的,尽管多线程功能强大,但是线程同步比较复杂,并且危险,稍有不慎就会崩溃死锁。单线程的好处就是不必考虑线程同步这样的复杂问题,简单而安全。如果需要真正的多线程JS可以使用Web Worker,它可以使密集的运算跑在另一个线程中,但为了安全起见,你不能直接在 worker 线程中操纵 DOM 元素;或使用window 对象中的某些方法和属性。(详情请看MDN中关于Web Worker的说明)

旧的React Reconciler

在React15及以前,React通过递归的方式创建虚拟dom,而这个过程是不可中断的,因此如果组件树的层级很深就会出现递归时间过长的情况。在这种情况下,JS线程中长时间的递归运算会阻塞GUI渲染线程,从而造成网页卡顿。

React团队为了解决这个问题,以及为了React未来的发展,花了很长的时间重构Reconciler。现在我们使用的react Reconciler是基于Fiber架构的,从不可中断的递归方式变成了可中断的异步方式

如果用图片来描述上述变化:
React Reconciler工作方式变化
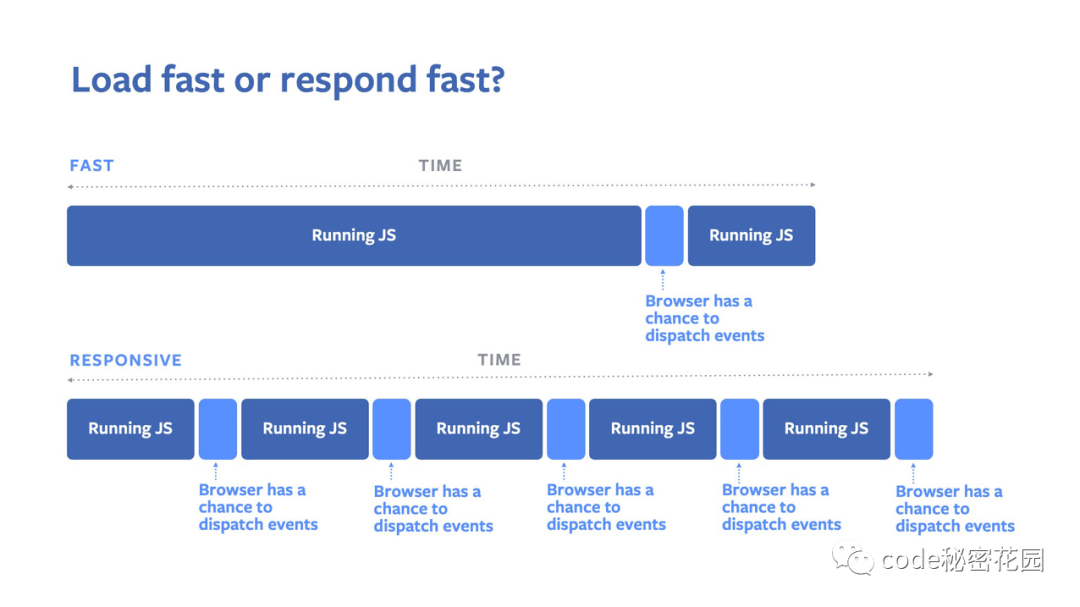
可以看到,原来的一整块JS密集运算(对应旧版Reconciler虚拟DOM的更新)成功被分割成了很多个子部分,这意味着浏览器的渲染进程每隔一段时间就能从JS线程中拿回控制权,完成其他必不可少的任务(例如GUI渲染线程、事件触发线程等),这样在高密度计算中渲染进程仍然有足够的机会去绘制页面,页面的卡顿问题迎刃而解。

新的React Reconciler

旧版的Reconciler工作方式采用递归调用,数据保存在递归调用栈中,因此也被称为Stack Reconciler;而新版Reconciler基于Fiber数据结构,因此被称为Fiber Reconciler

Fre中的Fiber结构

React中的代码太过庞大,为了说明Fiber Reconciler的思想,我们采用Fre中的IFiber结构进行说明(Fre框架是受React启发的,两者在某些方面大致相同)
先来看一下IFiber的定义:

1
2
3
4
5
6
7
8
9
10
11
12
13
14
15
16
17
18
19
20
21
22
23
24
25
26
27
28
29
30
export interface Attributes extends Record<string, any> {
key?: Key
children?: FreNode
ref?: Ref
}
export type HTMLElementEx = HTMLElement & { last: IFiber | null }
export interface IFiber<P extends Attributes = any> {
key?: string
type: string | FC<P>
parentNode: HTMLElementEx
node: HTMLElementEx //Fiber对应的真实DOM节点
kids?: any
parent?: IFiber<P>// 父Fiber节点
sibling?: IFiber<P>// 指向兄弟节点
child?: IFiber<P>// 子Fiber节点
done?: () => void
ref: IRef
hooks: IHook
oldProps: P
after: any
props: P
lane: number // 调度优先级相关
time: number
e: IFiber,
prev: IFiber,
d: IFiber,
laziness: any[],
dirty: boolean,
isComp: boolean,
}

Fre中的Schedule

React/Fre之所以能够采用异步中断的方式更新,靠的是Schedule的双循环机制

1
2
3
4
5
6
7
8
9
10
11
12
13
14
15
16
17
18
19
20
21
22
23
24
25
26
27
28
29
30
31
32
33
34
35
36
37
38
39
40
41
42
43
44
45
46
47
48
49
50
51
52
const queue: ITask[] = []
const threshold: number = 1000 / 60
const transitions = []
let deadline: number = 0

export const startTransition = (cb) => {
transitions.push(cb) && postMessage()
}

export const schedule = (callback: any): void => {
queue.push({ callback } as any)
startTransition(flush)
}

const postMessage = (() => {
const cb = () => transitions.splice(0, 1).forEach((c) => c())

if (typeof MessageChannel !== "undefined") {
const { port1, port2 } = new MessageChannel()
port1.onmessage = cb
return () => port2.postMessage(null)
}
return () => setTimeout(cb)
})()

const flush = (): void => {
deadline = getTime() + threshold
let job = peek(queue)
while (job && !shouldYield()) {
const { callback } = job as any
job.callback = null
const next = callback()
if (next) {
job.callback = next as any
} else {
queue.shift()
}
job = peek(queue)
}
job && startTransition(flush)
}

export const shouldYield = (): boolean => {
if (options.sync) return false
return (
(navigator as any)?.scheduling?.isInputPending() || getTime() >= deadline
)
}

export const getTime = () => performance.now()

const peek = (queue: ITask[]) => queue[0]

首先,Schedule会维护一个queue队列来放置任务,transitions里面只会存放flush函数,并且是外循环的入口

外循环

什么叫外循环?

  • 调用schedule函数,任务被压入queue队列里
  • 调用startTransition,flush被压入transitions
  • postMessage执行flush
  • flush的末尾又调用startTransition重新开启一轮循环

以上这个过程叫做外循环。

内循环

什么叫内循环?
注意到flush函数

1
2
3
4
5
6
7
8
9
10
11
12
13
14
15
16
17
18
19
20
21
22
23
24
const flush = (): void => {
deadline = getTime() + threshold
let job = peek(queue)
while (job && !shouldYield()) {
const { callback } = job as any
job.callback = null
const next = callback()
if (next) {
job.callback = next as any
} else {
queue.shift()
}
job = peek(queue)
}
job && startTransition(flush)
}
export const shouldYield = (): boolean => {
if (options.sync) return false
return (
(navigator as any)?.scheduling?.isInputPending() || getTime() >= deadline
)
}

export const getTime = () => performance.now()

deadline变量计算了什么时候应归还控制权给其他线程,这里的threshold是浏览器每帧渲染(一次完整的重绘)的最佳间隔时间

tips:浏览器每秒刷新的次数低于60hz人眼就会感知卡顿掉帧等情况,因此最多每隔1000/60=16(ms)的时间,我们就要将渲染进程的控制权交出去给浏览器渲染

内循环指的是flush函数内部while循环执行任务队列回调函数的过程。

我们再看flush函数里的while循环条件,一旦 浏览器感知到用户输入(对应isInputPending,该api在Chrome87中得到支持) 或者是内循环执行时间超过计算的deadline,就会跳出循环。如果任务队列中残留尚未执行的任务,则通过startTransition函数开启下一轮循环,继续执行。

通过内外循环交替的这种方式,我们成功实现了可中断的任务队列机制,这就是著名的时间分片机制

关于宏任务和浏览器渲染

注意到postMessage函数,我们用它来产生一个宏任务(如果浏览器支持MessageChannel就采用postMessage的方式,如果不支持就采用原始的setTimeout)
那么为什么要产生一个宏任务呢?
我们再回到浏览器的执行过程中去,如图,这是一段关于宏任务、微任务、浏览器渲染的抽象过程
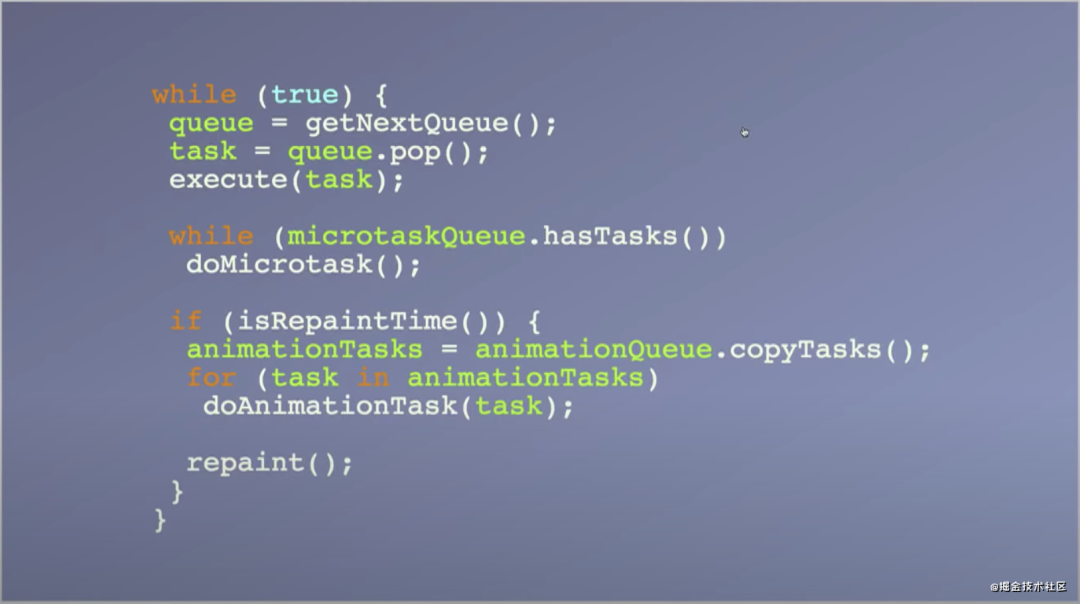
浏览器过程
我们现在要做到:

  • 将进程控制权交出去
  • 能够在将来的某个时刻继续执行未完成的任务

因此宏任务能够满足我们的需求,产生一个宏任务之后,我们未完成的计算任务会在下一次循环中继续执行,进程控制权也将转交给GUI渲染线程;如果把未完成的任务放在微任务里,则需等待微任务执行结束,页面才会更新,达不到我们的要求。

写在最后的话

本文从浏览器原理、Fre源码的角度讲述了Fiber架构中的一种中断原理,而真实的浏览器渲染过程、React源码远比文中讲的要复杂,感兴趣的同学可以去研读源码。技术受限,如有错误,联系作者,我们可以一起探讨更多细节。

块级函数

  • 先来看一道极具迷惑性的面试题

    1
    2
    3
    4
    5
    6
    7
    8
    var a;
    if(true){
    a=5;
    function a(){}
    a=0;
    console.log(a)
    }
    console.log(a)

    你可能会以为答案是0 0
    事实上,答案是0 5

  • 来看一下stackoverflow的解释
    这段代码在浏览器中是这么工作的

    1
    2
    3
    4
    5
    6
    7
    8
    9
    var a¹;
    if (true) {
    function a²() {} // hoisted
    a² = 5;
    a¹ = a²; // at the location of the declaration, the variable leaves the block
    a² = 0;
    console.log(a²)
    }
    console.log(a¹);

    这段代码的执行过程如下:

    • 在块外面和块里面都声明了a变量
    • 进入块作用域
      • function a(){}被提升至块作用域顶部
      • 执行a=5
      • 块作用域里的a被赋值为5,function a被覆盖
      • 执行到function a(){},ES6块作用域中的函数a(现在已经被赋值为5)被提升至块外最顶部,外部变量a被映射为块内a的值5
      • 此时块内a为5,因此外部的a也为5
      • a=0,块内的a被赋值为0,外部的不再受影响
      • 块内打印a,打印0
    • 离开块作用域,此时块内对块外为不可见状态
    • 打印外部变量a,此时外部a为5,因此打印5
  • debug实验


  • 在MDN官方文档中,对这种非严格模式下的块级函数声明作了解释,官方建议不要使用这种形式的函数定义,因为代码执行过程在不同的浏览器中是不同的,如果需要条件定义函数,推荐采用以下形式
    1
    2
    3
    4
    5
    let fn=null;
    if(condition){
    fn=function(){}
    }
    fn&&fn();
  • 相关链接

Promise

  • Promise的A+标准

    • 术语
      • promise:是一个拥有 then 方法的对象或函数,其行为符合本规范
      • thenable:是一个定义了 then 方法的对象或函数。这个主要是用来兼容一些老的Promise实现,只要一个Promise实现是thenable,也就是拥有then方法的,就可以跟Promises/A+兼容。
      • value:指reslove出来的值,可以是任何合法的JS值(包括 undefined , thenable 和 promise等)
      • exception:异常,在Promise里面用throw抛出来的值
      • reason:拒绝原因,是reject里面传的参数,表示reject的原因
    • Promise状态
      • pending: 一个promise在resolve或者reject前就处于这个状态。
      • fulfilled: 一个promise被resolve后就处于fulfilled状态,这个状态不能再改变,而且必须拥有一个不可变的值(value)。
      • rejected: 一个promise被reject后就处于rejected状态,这个状态也不能再改变,而且必须拥有一个不可变(引用不变)的拒绝原因(reason)。
    • then方法
      • 一个promise必须拥有一个then方法来访问他的值或者拒绝原因。then方法有两个参数:
        1
        2
        3
        4
        5
        6
        7
        8
        9
        10
        11
        12
        13
        14
        promise.then(onFulfilled, onRejected)
        //onFulfilled 和 onRejected 都是可选参数。
        //如果 onFulfilled 不是函数,其必须被忽略
        //如果 onRejected 不是函数,其必须被忽略

        //如果 onFulfilled 是函数:
        //当 promise 执行结束后其必须被调用,其第一个参数为 promise 的终值value
        //在 promise 执行结束前其不可被调用
        //其调用次数不可超过一次

        //如果 onRejected 是函数:
        //当 promise 被拒绝执行后其必须被调用,其第一个参数为 promise 的拒因reason
        //在 promise 被拒绝执行前其不可被调用
        //其调用次数不可超过一次
    • 多次调用
      • then 方法可以被同一个 promise 调用多次
      • 当 promise 成功执行时,所有 onFulfilled 需按照其注册顺序依次回调
      • 当 promise 被拒绝执行时,所有的 onRejected 需按照其注册顺序依次回调
    • 返回

      • then 方法必须返回一个 promise对象

      • promise2 = promise1.then(onFulfilled, onRejected);

        • 如果 onFulfilled 或者 onRejected 返回一个值 x ,则运行 Promise 解决过程:[[Resolve]](promise2, x)
        • 如果 onFulfilled 或者 onRejected 抛出一个异常 e ,则 promise2 必须拒绝执行,并返回拒因 e
        • 如果 onFulfilled 不是函数且 promise1 成功执行, promise2 必须成功执行并返回相同的值
        • 如果 onRejected 不是函数且 promise1 拒绝执行, promise2 必须拒绝执行并返回相同的据因
    • 剩下的标准在代码里有所体现
  • 手写A+标准的Promise

    1
    2
    3
    4
    5
    6
    7
    8
    9
    10
    11
    12
    13
    14
    15
    16
    17
    18
    19
    20
    21
    22
    23
    24
    25
    26
    27
    28
    29
    30
    31
    32
    33
    34
    35
    36
    37
    38
    39
    40
    41
    42
    43
    44
    45
    46
    47
    48
    49
    50
    51
    52
    53
    54
    55
    56
    57
    58
    59
    60
    61
    62
    63
    64
    65
    66
    67
    68
    69
    70
    71
    72
    73
    74
    75
    76
    77
    78
    79
    80
    81
    82
    83
    84
    85
    86
    87
    88
    89
    90
    91
    92
    93
    94
    95
    96
    97
    98
    99
    100
    101
    102
    103
    104
    105
    106
    107
    108
    109
    110
    111
    112
    113
    114
    115
    116
    117
    118
    119
    120
    121
    122
    123
    124
    125
    126
    127
    128
    129
    130
    131
    132
    133
    134
    135
    136
    137
    138
    139
    140
    141
    142
    143
    144
    145
    146
    147
    148
    149
    150
    151
    152
    153
    154
    155
    156
    157
    158
    159
    160
    161
    162
    163
    164
    165
    166
    167
    168
    169
    170
    171
    172
    173
    174
    175
    176
    177
    178
    179
    180
    181
    182
    183
    184
    185
    186
    187
    188
    189
    190
    191
    192
    193
    194
    //872 passing!
    var PENDING = 'pending';
    var FULFILLED = 'fulfilled';
    var REJECTED = 'rejected';
    function MyPromise(fn) {
    this.status = PENDING; //初始状态为pending
    this.value = null; //初始value为null
    this.reason = null; //初始reason为null

    this.onFulfilledCallbacks = []; //onFulfilled事件中心
    this.onRejectedCallbacks = []; //onRejected事件中心

    var that = this; //这个that是MyPromise中的this
    // 根据规范
    //resolve把status改为fulfilled,
    //reject把status改为rejected

    //resolve相当于发布一个成功事件
    function resolve(value) {
    if (that.status === PENDING) {
    that.status = FULFILLED;
    that.value = value;
    that.onFulfilledCallbacks.map((callback) => callback(that.value));
    }
    }
    //rejected相当于发布一个失败事件
    function rejected(reason) {
    if (that.status === PENDING) {
    that.status = REJECTED;
    that.reason = reason;
    that.onRejectedCallbacks.map((callback) => callback(that.reason));
    }
    }

    //如果有错误,马上捕获
    try {
    fn(resolve, rejected);
    } catch (err) {
    rejected(err);
    }
    }

    function resolvePromise(promise, x, resolve, reject) {
    //如果promise和x指向同一对象,抛出TypeError错误,并拒绝执行
    if (promise === x)
    return reject(new TypeError('resolvePromise: promise and x are the same!'));
    if (x instanceof MyPromise) {
    //如果x也是一个promise,那么继续执行,获取最终状态
    x.then(function (res) {
    resolvePromise(promise, res, resolve, reject);
    }, reject);
    } else if (typeof x === 'object' || typeof x === 'function') {
    //如果x不是一个promise
    if (x === null) {
    return resolve(x);
    }

    try {
    var then = x.then;
    } catch (err) {
    return reject(err);
    }

    //如果then是函数
    if (typeof then === 'function') {
    var called = false;
    try {
    then.call(
    x,
    function (y) {
    if (called) return;
    called = true;
    resolvePromise(promise, y, resolve, reject);
    },
    function (y) {
    if (called) return;
    called = true;
    reject(y);
    }
    );
    } catch (err) {
    //调用then方法抛出了异常

    //如果called已经为true,则不需要管then的执行情况,直接忽略
    if (called) return;
    reject(err);
    }
    } else {
    resolve(x);
    }
    } else {
    resolve(x);
    }
    }

    //then方法可以链式调用
    //a+规范中规定API为promise.then(onFulfilled, onRejected)
    //then方法放在prototype上
    MyPromise.prototype.then = function (onFulfilled, onRejected) {
    var that = this;

    //a+规范约定
    //若onFulfilled不是函数,则忽略
    //若onRejected不是函数,则忽略
    //这里的忽略不是什么都不做
    //对于onFulfilled来说,我们提供一个函数,将value原封不懂返回
    //对于onRejected来说,throw一个ERROR出去

    var realOnFulfilled = onFulfilled;
    if (typeof onFulfilled !== 'function') {
    realOnFulfilled = function (value) {
    return value;
    };
    }

    var realOnRejected = onRejected;
    if (typeof onRejected !== 'function') {
    realOnRejected = function (err) {
    throw err;
    };
    }

    //a+规范规定
    //then方法必须返回一个Promise对象

    //如果 onFulfilled
    //或者 onRejected 抛出一个异常 e ,则 promise2 必须拒绝执行,并返回拒因 e
    if (this.status === PENDING) {
    //这里有订阅发布模式的思想
    var promise2 = new MyPromise(function (resolve, reject) {
    that.onFulfilledCallbacks.push(function () {
    setTimeout(function () {
    try {
    var x = realOnFulfilled(that.value);
    resolvePromise(promise2, x, resolve, reject);
    } catch (err) {
    reject(err);
    }
    }, 0);
    }); //注册事件
    that.onRejectedCallbacks.push(function () {
    setTimeout(function () {
    try {
    var x = realOnRejected(that.reason);
    resolvePromise(promise2, x, resolve, reject);
    } catch (err) {
    reject(err);
    }
    }, 0);
    }); //注册事件
    });
    return promise2;
    }

    //如果 onFulfilled 不是函数且 promise1 成功执行, promise2 必须成功执行并返回相同的值
    if (this.status === FULFILLED) {
    var promise2 = new MyPromise(function (resolve, reject) {
    setTimeout(function () {
    try {
    if (typeof onFulfilled !== 'function') {
    resolve(that.value);
    } else {
    var x = realOnFulfilled(that.value);
    resolvePromise(promise2, x, resolve, reject);
    }
    } catch (err) {
    reject(err);
    }
    }, 0);
    });
    return promise2;
    }

    //如果onRejected 不是函数且 promise1 拒绝执行, promise2必须拒绝并返回相同的拒因
    //如果onRejected 是函数且promise1拒绝执行, promise2应该resolve
    if (this.status === REJECTED) {
    var promise2 = new MyPromise(function (resolve, reject) {
    setTimeout(function () {
    try {
    if (typeof onRejected !== 'function') {
    reject(that.reason);
    } else {
    var x = realOnRejected(that.reason);
    resolvePromise(promise2, x, resolve, reject);
    }
    } catch (err) {
    reject(err);
    }
    }, 0);
    });
    return promise2;
    }
    };

taro之api挂载

尽管Taro在相关的d文件中已经对api接口进行了声明,但是要了解实现过程,我们需要深入taro源码去探索。
经过代码的研读,我们发现taro的api挂载采用侵入式方法,核心实现函数是processApis

1
2
3
4
5
6
7
8
9
10
11
function processApis (taro, global, config: IProcessApisIOptions = {});

interface IProcessApisIOptions {
noPromiseApis?: Set<string>
needPromiseApis?: Set<string>
handleSyncApis?: (key: string, global: IObject, args: any[]) => any
transformMeta?: (key: string, options: IObject) => { key: string; options: IObject }
modifyAsyncResult?: (key: string, res) => void
isOnlyPromisify?: boolean
[propName: string]: any
}

该函数传入一个全局taro对象,以及对应平台的全局变量global(例如wx),以及对接口的自定义配置config,函数执行后,调用Taro[PromiseApi]的时候会返回一个Promise,该Promise内部调用global[PromiseApi]并对状态进行监听(例如success,fail,complete),并绑定至Promise的各个状态(例如success绑定至resolve),还会对DownloadTask进行特殊封装,比如:
1
2
3
4
5
6
7
8
9
10
11
12
13
14
// p为Taro[PromiseApi]要返回的Promise
// 给 promise 对象挂载属性
if (key === 'uploadFile' || key === 'downloadFile') {
p.progress = cb => {
// 这样在task的状态变更的时候会调用用户传进来的cb函数
task?.onProgressUpdate(cb)
return p
}
p.abort = cb => {
cb?.()
task?.abort()
return p
}
}

微信异步api约定/async.png)

taro的小程序部分,以MiniPlugin为核心,以下是MiniPlugin的入口

1
2
3
4
5
6
7
8
9
10
11
12
13
14
15
16
17
18
19
20
21
22
23
24
25
26
27
28
29
30
31
32
33
34
35
36
37
38
39
40
41
42
43
44
45
46
47
48
49
50
51
52
53
54
55
56
57
58
59
60
61
62
63
64
65
66
67
68
69
70
71
72
73
74
75
76
77
78
79
80
81
82
83
84
85
86
87
88
89
90
91
92
93
94
95
96
97
98
99
100
101
102
103
104
105
106
107
108
109
110
111
112
113
114
115
116
117
118
119
120
121
122
123
124
125
126
127
128
129
130
131
132
133
134
135
136
137
138
139
140
141
142
143
144
145
146
147
148
149
150
apply (compiler: webpack.Compiler) {
this.context = compiler.context
this.appEntry = this.getAppEntry(compiler)
const {
commonChunks,
addChunkPages,
framework,
isBuildQuickapp,
isBuildPlugin,
fileType
} = this.options
/** build mode */
compiler.hooks.run.tapAsync(
PLUGIN_NAME,
this.tryAsync(async (compiler: webpack.Compiler) => {
await this.run(compiler)
new TaroLoadChunksPlugin({
commonChunks: commonChunks,
isBuildPlugin,
addChunkPages: addChunkPages,
pages: this.pages,
framework: framework,
isBuildQuickapp
}).apply(compiler)
})
)

/** compilation.addEntry */
compiler.hooks.make.tapAsync(
PLUGIN_NAME,
this.tryAsync(async (compilation: webpack.compilation.Compilation) => {
const dependencies = this.dependencies
const promises: Promise<null>[] = []
this.compileIndependentPages(compiler, compilation, dependencies, promises)
dependencies.forEach(dep => {
promises.push(new Promise<null>((resolve, reject) => {
compilation.addEntry(this.options.sourceDir, dep, dep.name, err => err ? reject(err) : resolve(null))
}))
})
await Promise.all(promises)
await this.options.onCompilerMake?.(compilation)
})
)

compiler.hooks.compilation.tap(PLUGIN_NAME, (compilation, { normalModuleFactory }) => {
/** For Webpack compilation get factory from compilation.dependencyFactories by denpendence's constructor */
compilation.dependencyFactories.set(SingleEntryDependency, normalModuleFactory)
compilation.dependencyFactories.set(TaroSingleEntryDependency as any, normalModuleFactory)

/**
* webpack NormalModule 在 runLoaders 真正解析资源的前一刻,
* 往 NormalModule.loaders 中插入对应的 Taro Loader
*/
compilation.hooks.normalModuleLoader.tap(PLUGIN_NAME, (loaderContext, module:/** TaroNormalModule */ any) => {
const { framework, designWidth, deviceRatio } = this.options
if (module.miniType === META_TYPE.ENTRY) {
const loaderName = '@tarojs/taro-loader'
if (!isLoaderExist(module.loaders, loaderName)) {
module.loaders.unshift({
loader: loaderName,
options: {
framework,
prerender: this.prerenderPages.size > 0,
config: this.appConfig,
runtimePath: this.options.runtimePath,
blended: this.options.blended,
pxTransformConfig: {
designWidth: designWidth || 750,
deviceRatio: deviceRatio || {
750: 1
}
}
}
})
}
} else if (module.miniType === META_TYPE.PAGE) {
let isIndependent = false
this.independentPackages.forEach(pages => {
if (pages.includes(module.resource)) {
isIndependent = true
}
})
const loaderName = isIndependent ? '@tarojs/taro-loader/lib/independentPage' : this.pageLoaderName
if (!isLoaderExist(module.loaders, loaderName)) {
module.loaders.unshift({
loader: isBuildPlugin ? '@tarojs/taro-loader/lib/native-component' : loaderName,
options: {
framework,
name: module.name,
prerender: this.prerenderPages.has(module.name),
config: this.filesConfig,
appConfig: this.appConfig,
runtimePath: this.options.runtimePath
}
})
}
} else if (module.miniType === META_TYPE.COMPONENT) {
const loaderName = isBuildPlugin ? '@tarojs/taro-loader/lib/native-component' : '@tarojs/taro-loader/lib/component'
if (!isLoaderExist(module.loaders, loaderName)) {
module.loaders.unshift({
loader: loaderName,
options: {
framework,
name: module.name,
prerender: this.prerenderPages.has(module.name),
runtimePath: this.options.runtimePath
}
})
}
}
})

/**
* 与原生小程序混写时解析模板与样式
*/
compilation.hooks.afterOptimizeAssets.tap(PLUGIN_NAME, assets => {
Object.keys(assets).forEach(assetPath => {
const styleExt = fileType.style
const templExt = fileType.templ
if (new RegExp(`(\\${styleExt}|\\${templExt})\\.js(\\.map){0,1}$`).test(assetPath)) {
delete assets[assetPath]
} else if (new RegExp(`${styleExt}${styleExt}$`).test(assetPath)) {
const assetObj = assets[assetPath]
const newAssetPath = assetPath.replace(styleExt, '')
assets[newAssetPath] = assetObj
delete assets[assetPath]
}
})
})
})

/**
* 在compiler的emitHook中生成小程序的相关文件
*/
compiler.hooks.emit.tapAsync(
PLUGIN_NAME,
this.tryAsync(async (compilation: webpack.compilation.Compilation) => {
await this.generateMiniFiles(compilation)
})
)

compiler.hooks.afterEmit.tapAsync(
PLUGIN_NAME,
this.tryAsync(async (compilation: webpack.compilation.Compilation) => {
await this.addTarBarFilesToDependencies(compilation)
})
)

new TaroNormalModulesPlugin().apply(compiler)
}

this.run()

1
2
3
4
5
6
7
8
9
10
11
12
13
14
15
16
17
18
19
20
21
22
23
24
25
26
27
28
29
30
31
/**
* 分析 app 入口文件,搜集页面、组件信息,
* 往 this.dependencies 中添加资源模块
*/
run (compiler: webpack.Compiler) {
if (this.options.isBuildPlugin) {
// 如果是在构建小程序插件
this.getPluginFiles()
this.getConfigFiles(compiler)
} else {
// 如果在构建小程序

// 获取小程序配置
this.appConfig = this.getAppConfig()

// 分析小程序页面
this.getPages()

// 分析小程序页面配置
this.getPagesConfig()

// 黑暗模式相关
this.getDarkMode()

// 往 this.dependencies 中新增或修改所有 config 配置模块
this.getConfigFiles(compiler)

// 在 this.dependencies 中新增或修改 app、模板组件、页面、组件等资源模块
this.addEntries()
}
}

下面我们分析一下各语句的作用,我们只关注小程序的构建模块,先看this.getAppConfig()

this.getAppConfig

Treap树的定义

Treap树的名字即为Tree和Heap的结合,它既是一颗二叉查找树(BST),又满足堆的性质(通过左旋右旋不改变Treap的二叉查找树性质而又尽可能的平衡)

Treap树的结构

1
2
3
4
5
6
7
8
9
10
11
struct node{
int l,r,v,siz,rnd,cnt;
}p[manx];
int cnt;
//l:左节点id
//r:右节点id
//v:节点权重
//siz:子树大小
//p[x].cnt:v的出现次数,这样权重相同的节点作为一个点来处理
//cnt:总共的节点个数
//node节点中可以加入其他需要维护的信息

节点更新

每当节点关系更改时,需要更新节点信息,包括

  • 节点的子树大小
  • 维护的其他内容
    1
    2
    3
    inline void update(int id){
    p[id].siz=p[p[id].l].siz+p[p[id].r].siz+p[id].cnt;
    }

左旋和右旋

左旋和右旋是Treap树的核心操作,每个节点在插入时都被赋予了随机的优先级$rnd$,通过保证优先级的堆性质,进而保证了Treap树的期望高度是$\log n$,而不至于退化为链,是Treap树尽可能保持平衡的关键

  • 左旋和右旋不改变节点的二叉树查找树性质
  • 该操作保证$rnd$的小顶堆性质
  • 右旋: 左儿子的$rnd$小于父节点时,左儿子的右儿子$\Rightarrow$父节点的左儿子,父节点$\Rightarrow$左儿子的新右儿子
  • 左旋: 右儿子的$rnd$小于父节点时,右儿子的左儿子$\Rightarrow$父节点的右儿子,父节点$\Rightarrow$右儿子的新左儿子
    Treap树旋转图解
  • 右旋代码如下
    1
    2
    3
    4
    5
    6
    7
    8
    void rturn(int &k){
    int tmp=p[k].l;//记录左儿子
    p[k].l=p[tmp].r;//左儿子的右儿子变成父节点的左儿子
    p[tmp].r=k;//父节点变成左儿子的新右儿子
    p[tmp].siz=p[k].siz;//整个子树的大小不变
    update(k);//新右节点更新
    k=tmp;//左儿子变成了新父节点,完成了右旋上位
    }
  • 左旋同理

节点插入和删除

插入

1
2
3
4
5
6
7
8
9
10
11
12
13
14
15
16
17
18
19
20
21
22
23
void insert(int &id,int val){
if(!id){
//如果到叶子节点了
id=++cnt;
p[id].siz=1;
p[id].cnt=1;
p[id].val=val;
p[id].rnd=rand();//随机优先级
return;
}
p[id].siz++;
if(p[id].val==val)
p[id].cnt++;
else if(p[id].val<val){
insert(p[id].r,val);
if(p[p[id].r].rnd<p[id].rnd)
lturn(id);
}else{
insert(p[id].l,val);
if(p[p[id].l].rnd<p[id].rnd)
rturn(id);
}
}

删除

1
2
3
4
5
6
7
8
9
10
11
12
13
14
15
16
17
18
19
20
21
22
23
24
25
26
void del(int &id,int val){
if(!id)
return;
if(p[id].val==val){
if(p[id].cnt>1){
p[id].cnt--;
p[id].siz--;
}else{
if(p[id].l==0||p[id].r==0)
id=p[id].l+p[id].r;//如果该节点最多只有一个子节点,那么子节点接上或者直接删除该节点
else if(p[p[id].l].rnd<p[p[id].r].rnd){
rturn(id);
del(id,val);
}else{
lturn(id);
del(id,val);
}
}
}else if(val>p[id].val){
p[id].siz--;
del(p[id].r,val);
}else{
p[id].siz--;
del(p[id].l,val);
}
}

查询val的排名

1
2
3
4
5
6
7
8
9
10
int find_rank(int id,int val){
if(id==0)
return 0;
if(p[id].val==val)
return p[p[id].l].siz+1;
else if(p[id].val<val)
return p[p[id].l].siz+p[id].cnt+find_rank(p[id].r,val);
else
return find_rank(p[id].l,val);
}

查询排名为k的数

  • 如果k小于父节点左子树的大小,那么这个数一定在左子树里面,就到左子树里查找排名为$k$的数
  • 如果k大于左子树与父节点的大小之和,那么到右子树去找排名为$k-(p[l].siz+cnt)$的数
  • 如果既不在左子树也不右子树,父节点就是我们要找的数
    1
    2
    3
    4
    5
    6
    7
    8
    9
    int kth(int id,int k)
    {
    if(k<=p[p[id].l].siz)
    return kth(p[id].l,k);
    else if(k>p[p[id].l].siz+p[id].cnt)
    return kth(p[id].r,k-(p[p[id].l].siz+p[id].cnt));
    else
    return p[id].val;
    }

查询val的前驱

1
2
3
4
5
6
7
8
9
const int INF=0x3f3f3f3f;
int pre(int id,int val){
if(!id)
return -INF;
if(p[id].val>=val)
return pre(p[id].l,val);
else
return max(p[id].val,pre(p[id].r,val));
}

查询val的后继

1
2
3
4
5
6
7
8
9
const int INF=0x3f3f3f3f;
int nxt(int id,int val){
if(!id)
return INF;
if(p[id].val<=val)
return nxt(p[id].r,val);
else
return min(p[id].val,nxt(p[id].l,val));
}

完整模板

1
2
3
4
5
6
7
8
9
10
11
12
13
14
15
16
17
18
19
20
21
22
23
24
25
26
27
28
29
30
31
32
33
34
35
36
37
38
39
40
41
42
43
44
45
46
47
48
49
50
51
52
53
54
55
56
57
58
59
60
61
62
63
64
65
66
67
68
69
70
71
72
73
74
75
76
77
78
79
80
81
82
83
84
85
86
87
88
89
90
91
92
93
94
95
96
97
98
99
100
101
102
103
104
105
106
107
108
109
110
111
112
113
114
115
const int INF = 0x3f3f3f3f;
struct node {
int l, r, val, siz, rnd, cnt;
} p[maxn];
int cnt;

inline void update(int id) {
p[id].siz = p[p[id].l].siz + p[p[id].r].siz + p[id].cnt;
}

void rturn(int &k) {
int tmp = p[k].l;
p[k].l = p[tmp].r;
p[tmp].r = k;
p[tmp].siz = p[k].siz;
update(k);
k = tmp;
}

void lturn(int &k) {
int tmp = p[k].r;
p[k].r = p[tmp].l;
p[tmp].l = k;
p[tmp].siz = p[k].siz;
update(k);
k = tmp;
}

void insert(int &id, int val) {
if (!id) {
id = ++cnt;
p[id].siz = 1;
p[id].cnt = 1;
p[id].val = val;
p[id].rnd = rand();
return;
}
p[id].siz++;
if (p[id].val == val)
p[id].cnt++;
else if (p[id].val < val) {
insert(p[id].r, val);
if (p[p[id].r].rnd < p[id].rnd)
lturn(id);
} else {
insert(p[id].l, val);
if (p[p[id].l].rnd < p[id].rnd)
rturn(id);
}
}

void del(int &id, int val) {
if (!id)
return;
if (p[id].val == val) {
if (p[id].cnt > 1) {
p[id].cnt--;
p[id].siz--;
} else {
if (p[id].l == 0 || p[id].r == 0)
id = p[id].l + p[id].r;
else if (p[p[id].l].rnd < p[p[id].r].rnd) {
rturn(id);
del(id, val);
} else {
lturn(id);
del(id, val);
}
}
} else if (val > p[id].val) {
p[id].siz--;
del(p[id].r, val);
} else {
p[id].siz--;
del(p[id].l, val);
}
}

int find_rank(int id, int val) {
if (id == 0)
return 0;
if (p[id].val == val)
return p[p[id].l].siz + 1;
else if (p[id].val < val)
return p[p[id].l].siz + p[id].cnt + find_rank(p[id].r, val);
else
return find_rank(p[id].l, val);
}

int kth(int id, int k) {
if (k <= p[p[id].l].siz)
return kth(p[id].l, k);
else if (k > p[p[id].l].siz + p[id].cnt)
return kth(p[id].r, k - (p[p[id].l].siz + p[id].cnt));
else
return p[id].val;
}

int pre(int id, int val) {
if (!id)
return -INF;
if (p[id].val >= val)
return pre(p[id].l, val);
else
return max(p[id].val, pre(p[id].r, val));
}

int nxt(int id, int val) {
if (!id)
return INF;
if (p[id].val <= val)
return nxt(p[id].r, val);
else
return min(p[id].val, nxt(p[id].l, val));
}

前言

待补充

React.createElement

当我们用JSX编写react代码的时候,代码会经过Babel处理后转换为React.createElement的特殊形式,例如

1
2
3
4
ReactDOM.render(
<h1 style={{"color":"blue"}}>hello world</h1>,
document.getElementById('root')
);

处理之后,就变成了
1
2
3
4
5
6
7
8
ReactDOM.render(
React.createElement(
'h1',
{ style: { "color": "blue" } },
'hello world'
),
document.getElementById('root')
);

我们来看看React源代码:
1
2
3
4
5
6
7
// 文件位置:src/isomorphic/React.js
var ReactElement = require('ReactElement');
var createElement = ReactElement.createElement;
var React = {
createElement: createElement,
}
module.exports = React;

最小生成树模板

1
2
3
4
5
6
7
8
9
10
11
12
13
14
15
16
17
18
19
20
21
22
23
24
25
26
27
28
29
30
31
32
33
34
35
36
37
38
39
40
41
42
43
44
45
46
47
48
49
50
51
52
53
54
55
56
57
58
59
60
#include <cstdio>
#include <algorithm>
using namespace std;
const int N = 1000005;
struct Node {
int x, y, z;
} edge[N];

int par[N];

void init(int n) {
for (int i = 0; i <= n; i++) {
par[i] = i;
}
}

bool cmp(Node x, Node y) {
return x.z < y.z;
}

int find(int x) {
if (x == par[x]) return par[x];
else return par[x] = find(par[x]);
}

int tot, ans;

int main() {
int n, m;
while (~scanf("%d", &n)) {
if (n == 0)
break;
ans = 0;
m = n * (n - 1) / 2;
init(n);
for (int i = 1; i <= m; i++) {
int x, y, z;
scanf("%d %d %d", &x, &y, &z);
edge[i].x = x;
edge[i].y = y;
edge[i].z = z;
}
std::sort(edge + 1, edge + 1 + m, cmp);

for (int i = 1; i <= m; i++) {
int x = find(edge[i].x);
int y = find(edge[i].y);
if (x == y) continue;

tot++;
par[x] = y;
ans += edge[i].z;
}
if (tot < n - 1);
//生成失败
else
printf("%d\n", ans);
}
return 0;
}